Blog
- 11 Oct 2015 » Short Review: UAP+ ZeroLift Cylinder (UK)
While I was on a business trip in London, I couldn’t resist going to a hardware store and buying some UK lock to satisfy my collector instinct. I was surprised to find a lock that claims to protect against many of the commonly known threats at once (including picking and bumping) while also being extraordinarily cheap: The UAP+ ZeroLift Cylinder.
Packaging, Promises and Price
So here’s the packaging of the cylinder
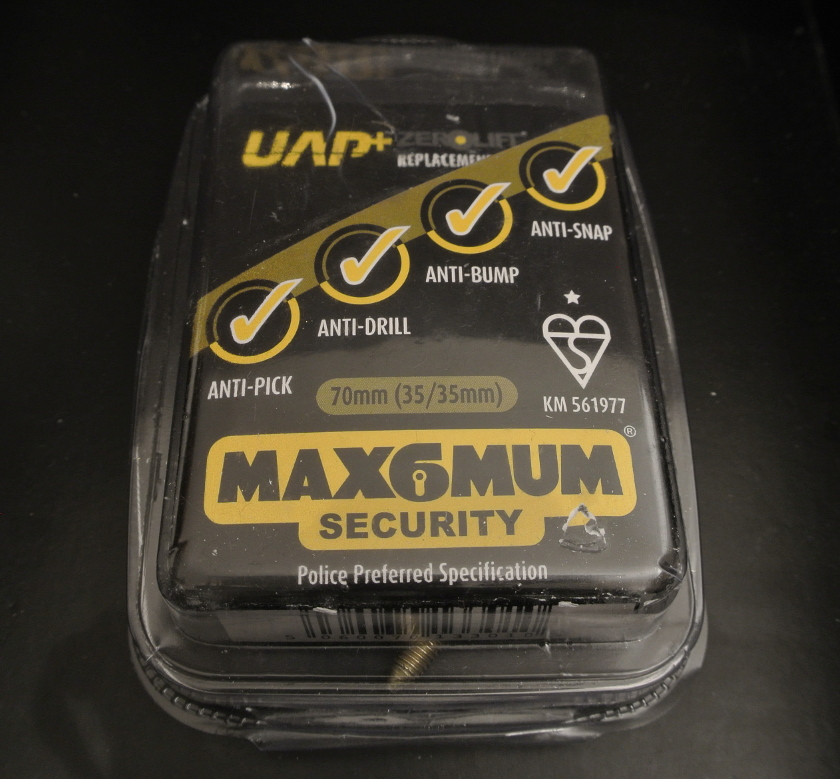
which already makes some serious claims:
- Anti-Pick
- Anti-Drill
- Anti-Bump
- Anti-Snap
It should be noted that “Anti-“ in this case does not mean that the lock is immune to this kind of attack. Instead the manufacturer meant to say that the lock is resistant to these attacks, making them harder to carry out, compared to usual cylinders. I’ve watched one of UAP’s advertising videos and they use the term resistant themselves, it’s just not clarified on the packaging. However, for the purpose of the lock (regular burglary protection), providing resistance against these attacks is all that is required.
Also, for the price of 12.49 GBP (around 17 EUR / 19 USD) referring to 35/35 length, getting a lock that is resistant to these attacks would be a great deal.
Anti-Pick
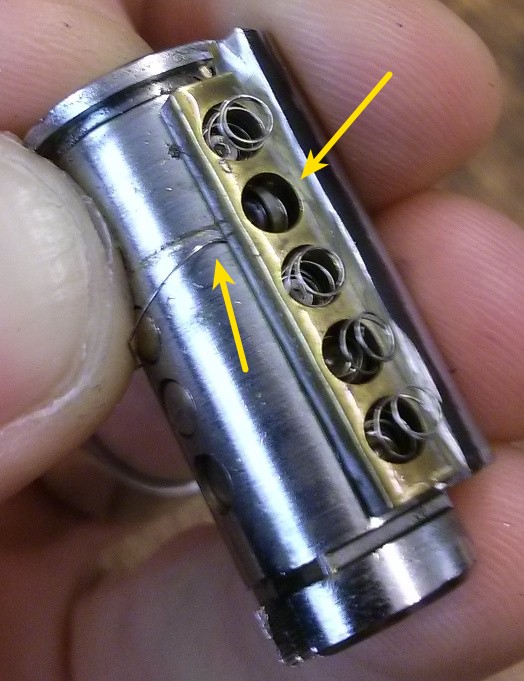
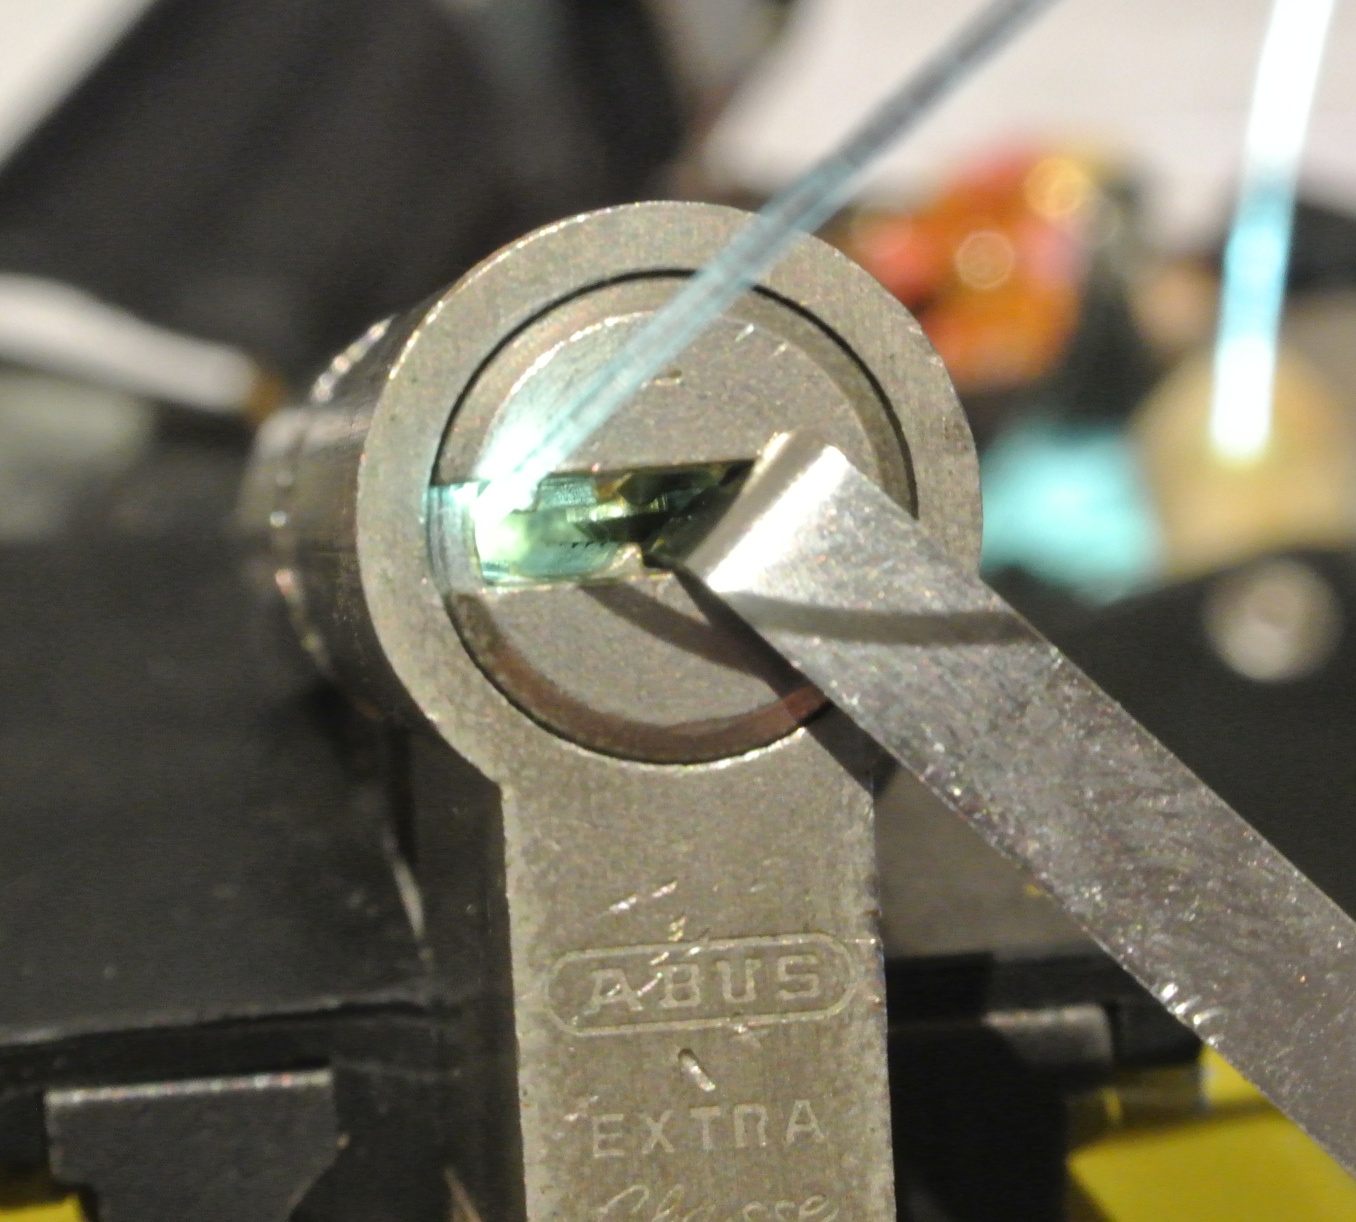
Since I’m a lock picker, I tried to hand pick the lock first. And indeed, it provided a fair amount of resistance: It took me around 8 minutes to open it for the first time. The lock felt a little weird to pick overall and seemed to have some extreme spools in it. So I went on to disassemble it and figure out what kind of pins were used:
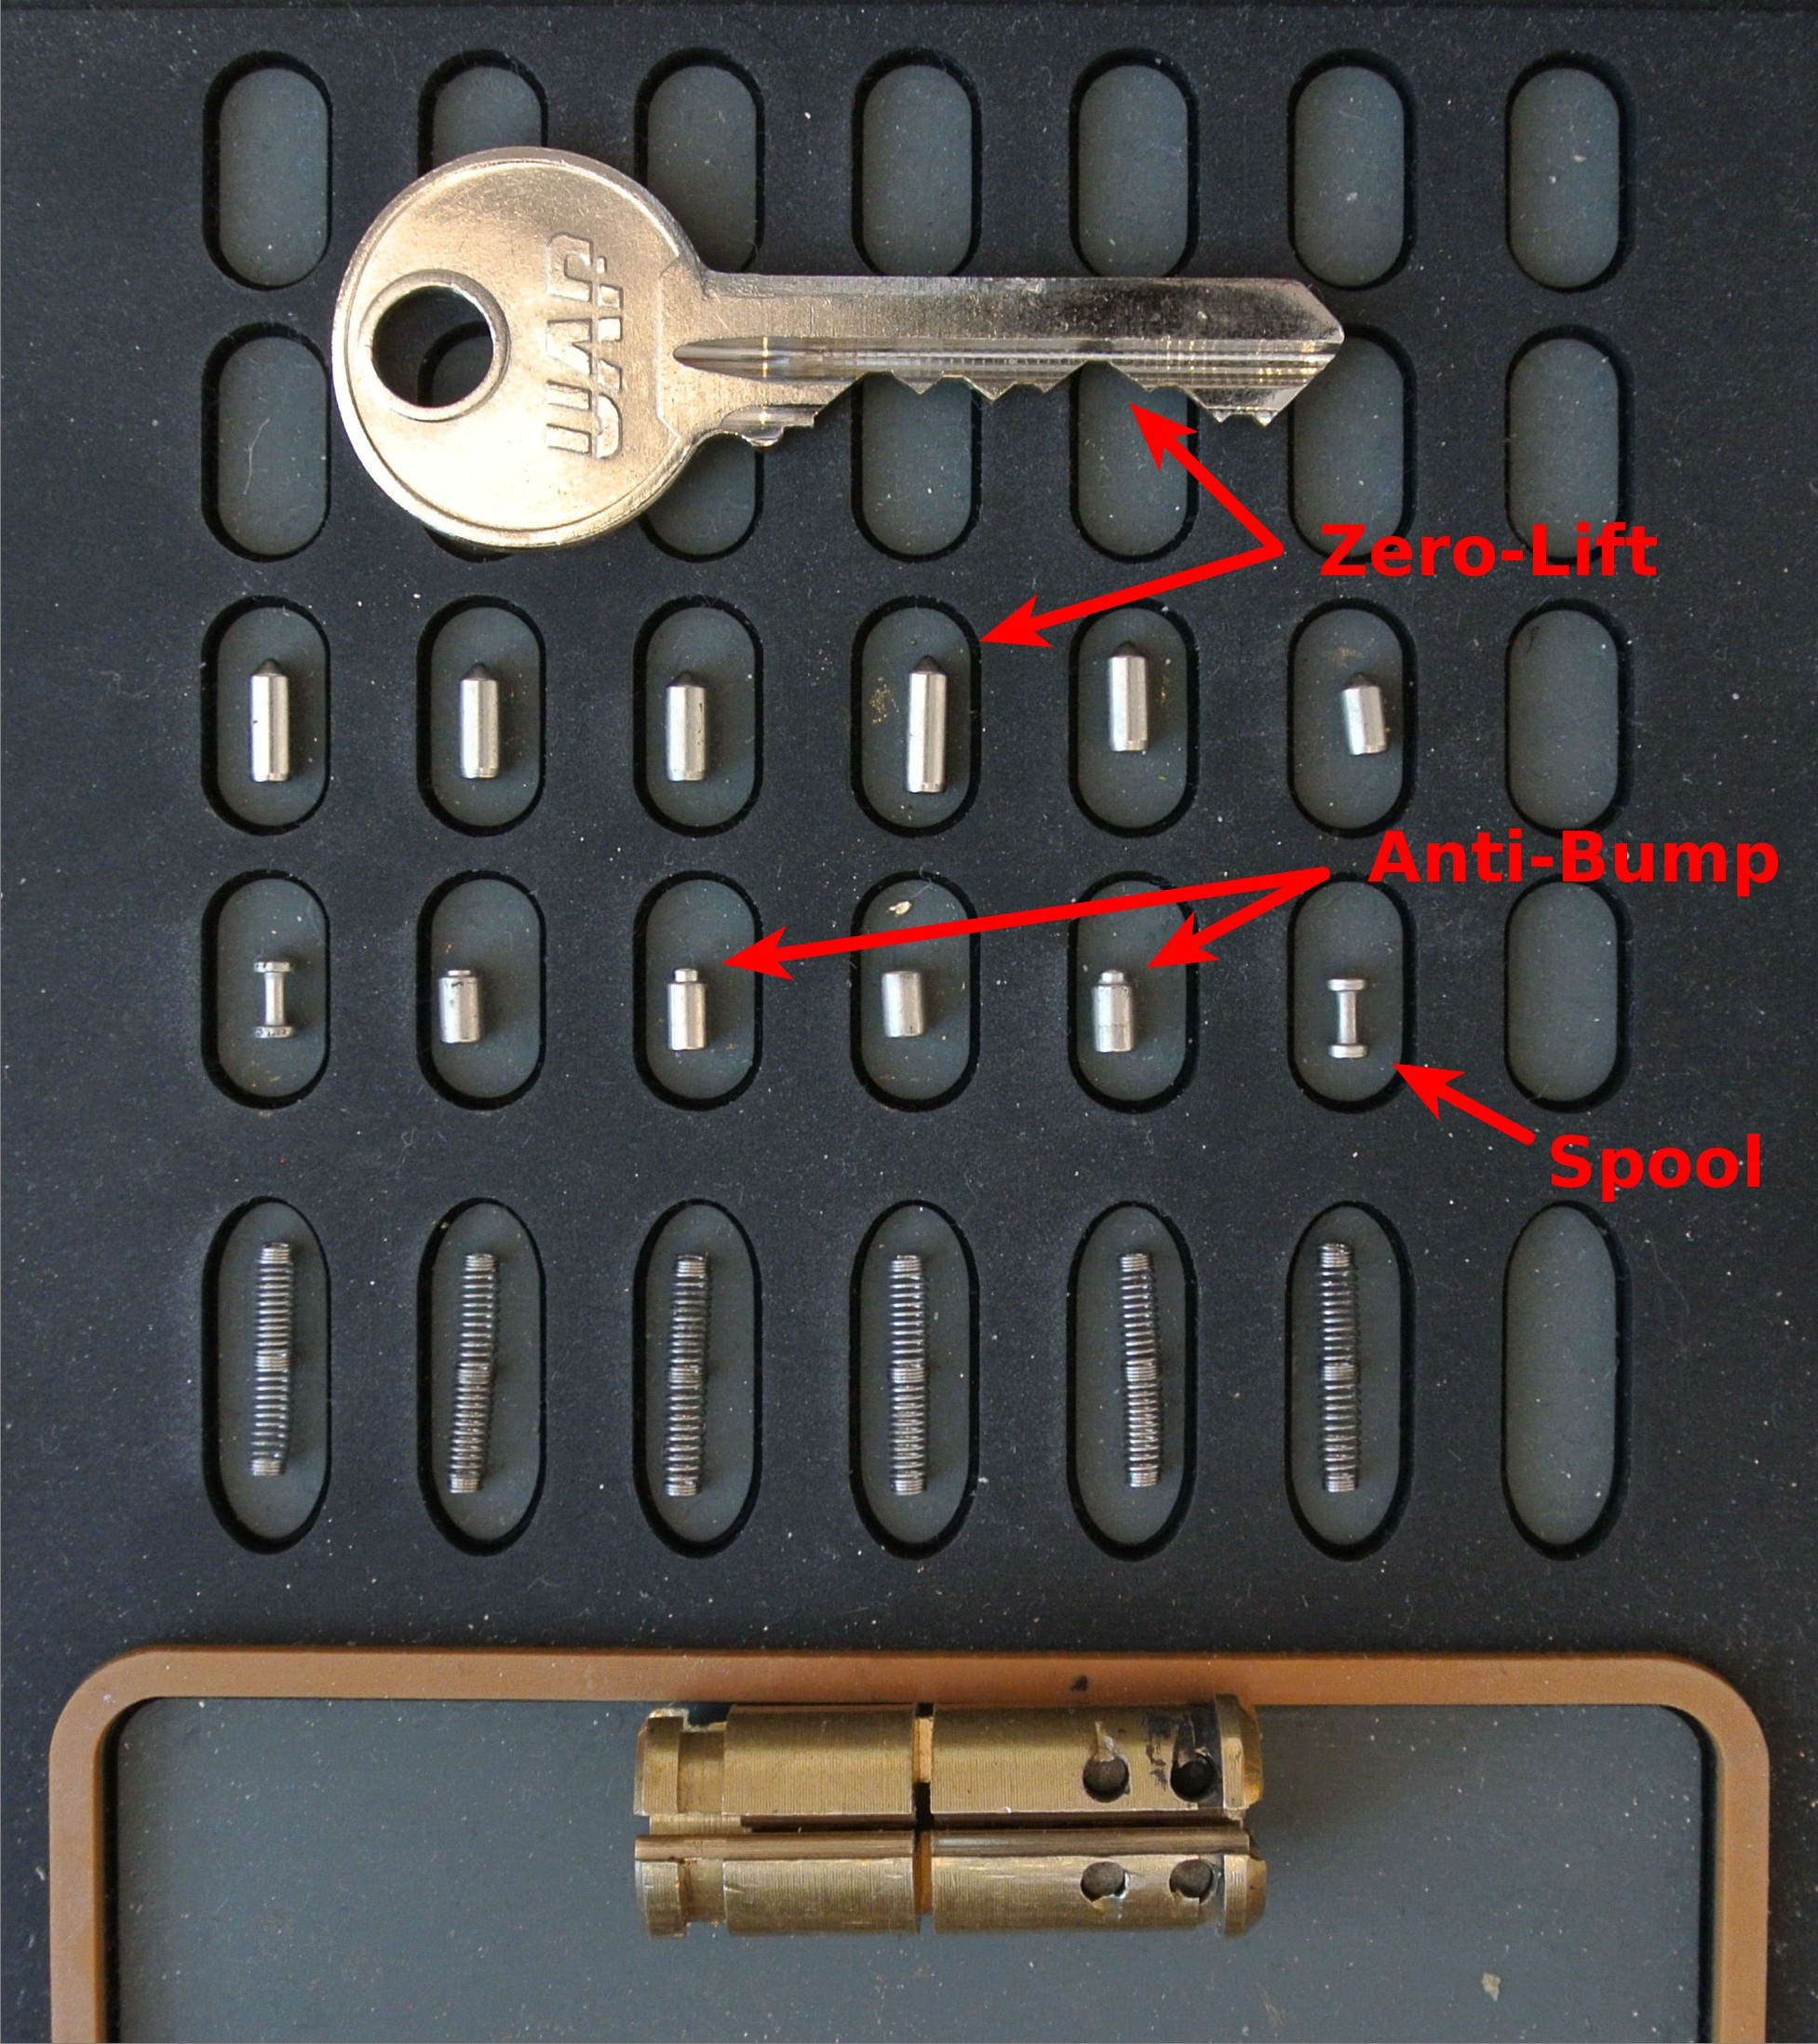
As we can see, we have two extreme spools that cause a fair amount of rotation when engaged. In addition, we have these pins with a thinner part on the top that can pop back into the core when setting spools, making the process of picking even longer. Even with that knowledge and a lot of skill, it still takes me up to a few minutes to open the lock (and burglars are not experienced lock pickers in my opinion). We also notice that one key pin is extremely long and in fact doesn’t require any lifting (hence the name ZeroLift):
According to the patents, this pin was mainly introduced to make bumping harder (see below), but it also effectively prevents novice raking attacks: During raking, it is highly likely that you touch the ZeroLift pin and overlift it, keeping the lock closed. Raking is one of the more likely picking methods used by a burglar (although even that is rare), so defending against that is very useful.
Anti-Bump
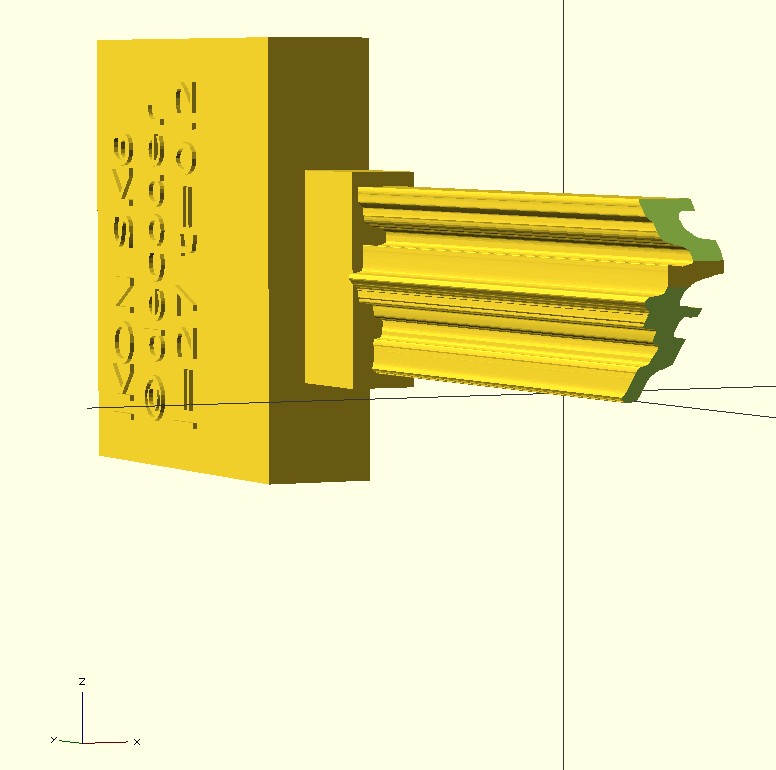
Next we will take a look at bumping this cylinder. As we previously described, this system always has one pin with the maximum length. Assuming that we cut down a bump key from an existing key, keeping the cut angle and spacings and going a little deeper than the deepest cut, we likely end up with a bump key that looks like this:
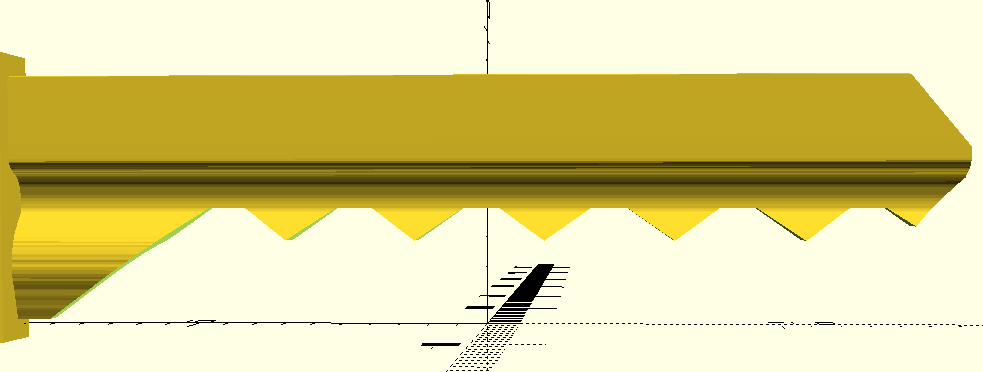
I measured the distances (cut height, pin spacing, etc.) from the key and estimated the cut angle carefully, since I did not have technical specifications available that gives me this data. Therefore, the picture might not be 100% accurate. However, it is clear that with these specifications, the ramps of the bump key are quite small and therefore will only engage the pins slightly. That makes bumping harder because less energy can be transferred to the pins. However, this doesn’t prevent bumping because we can simply adjust the specifications a little: By making the cut angle (a little) steeper, you can already make the ramps longer and therefore improve the bump key. The same holds for reducing the cut space a little (some bump keys even work better when doing this).
However, looking at the pins, even a modified bump key will probably not open this look very easily. The pins with the thin end on top can re-enter the core even after some rotation which can help preventing the bump key from opening.
Overall I believe that it should be possible to make working bump keys for this lock, but that they won’t work so easily. For me, that qualifies as bump resistant and maybe I will try to make a bump key for this lock in the future.
Anti-Drill / Anti-Snap
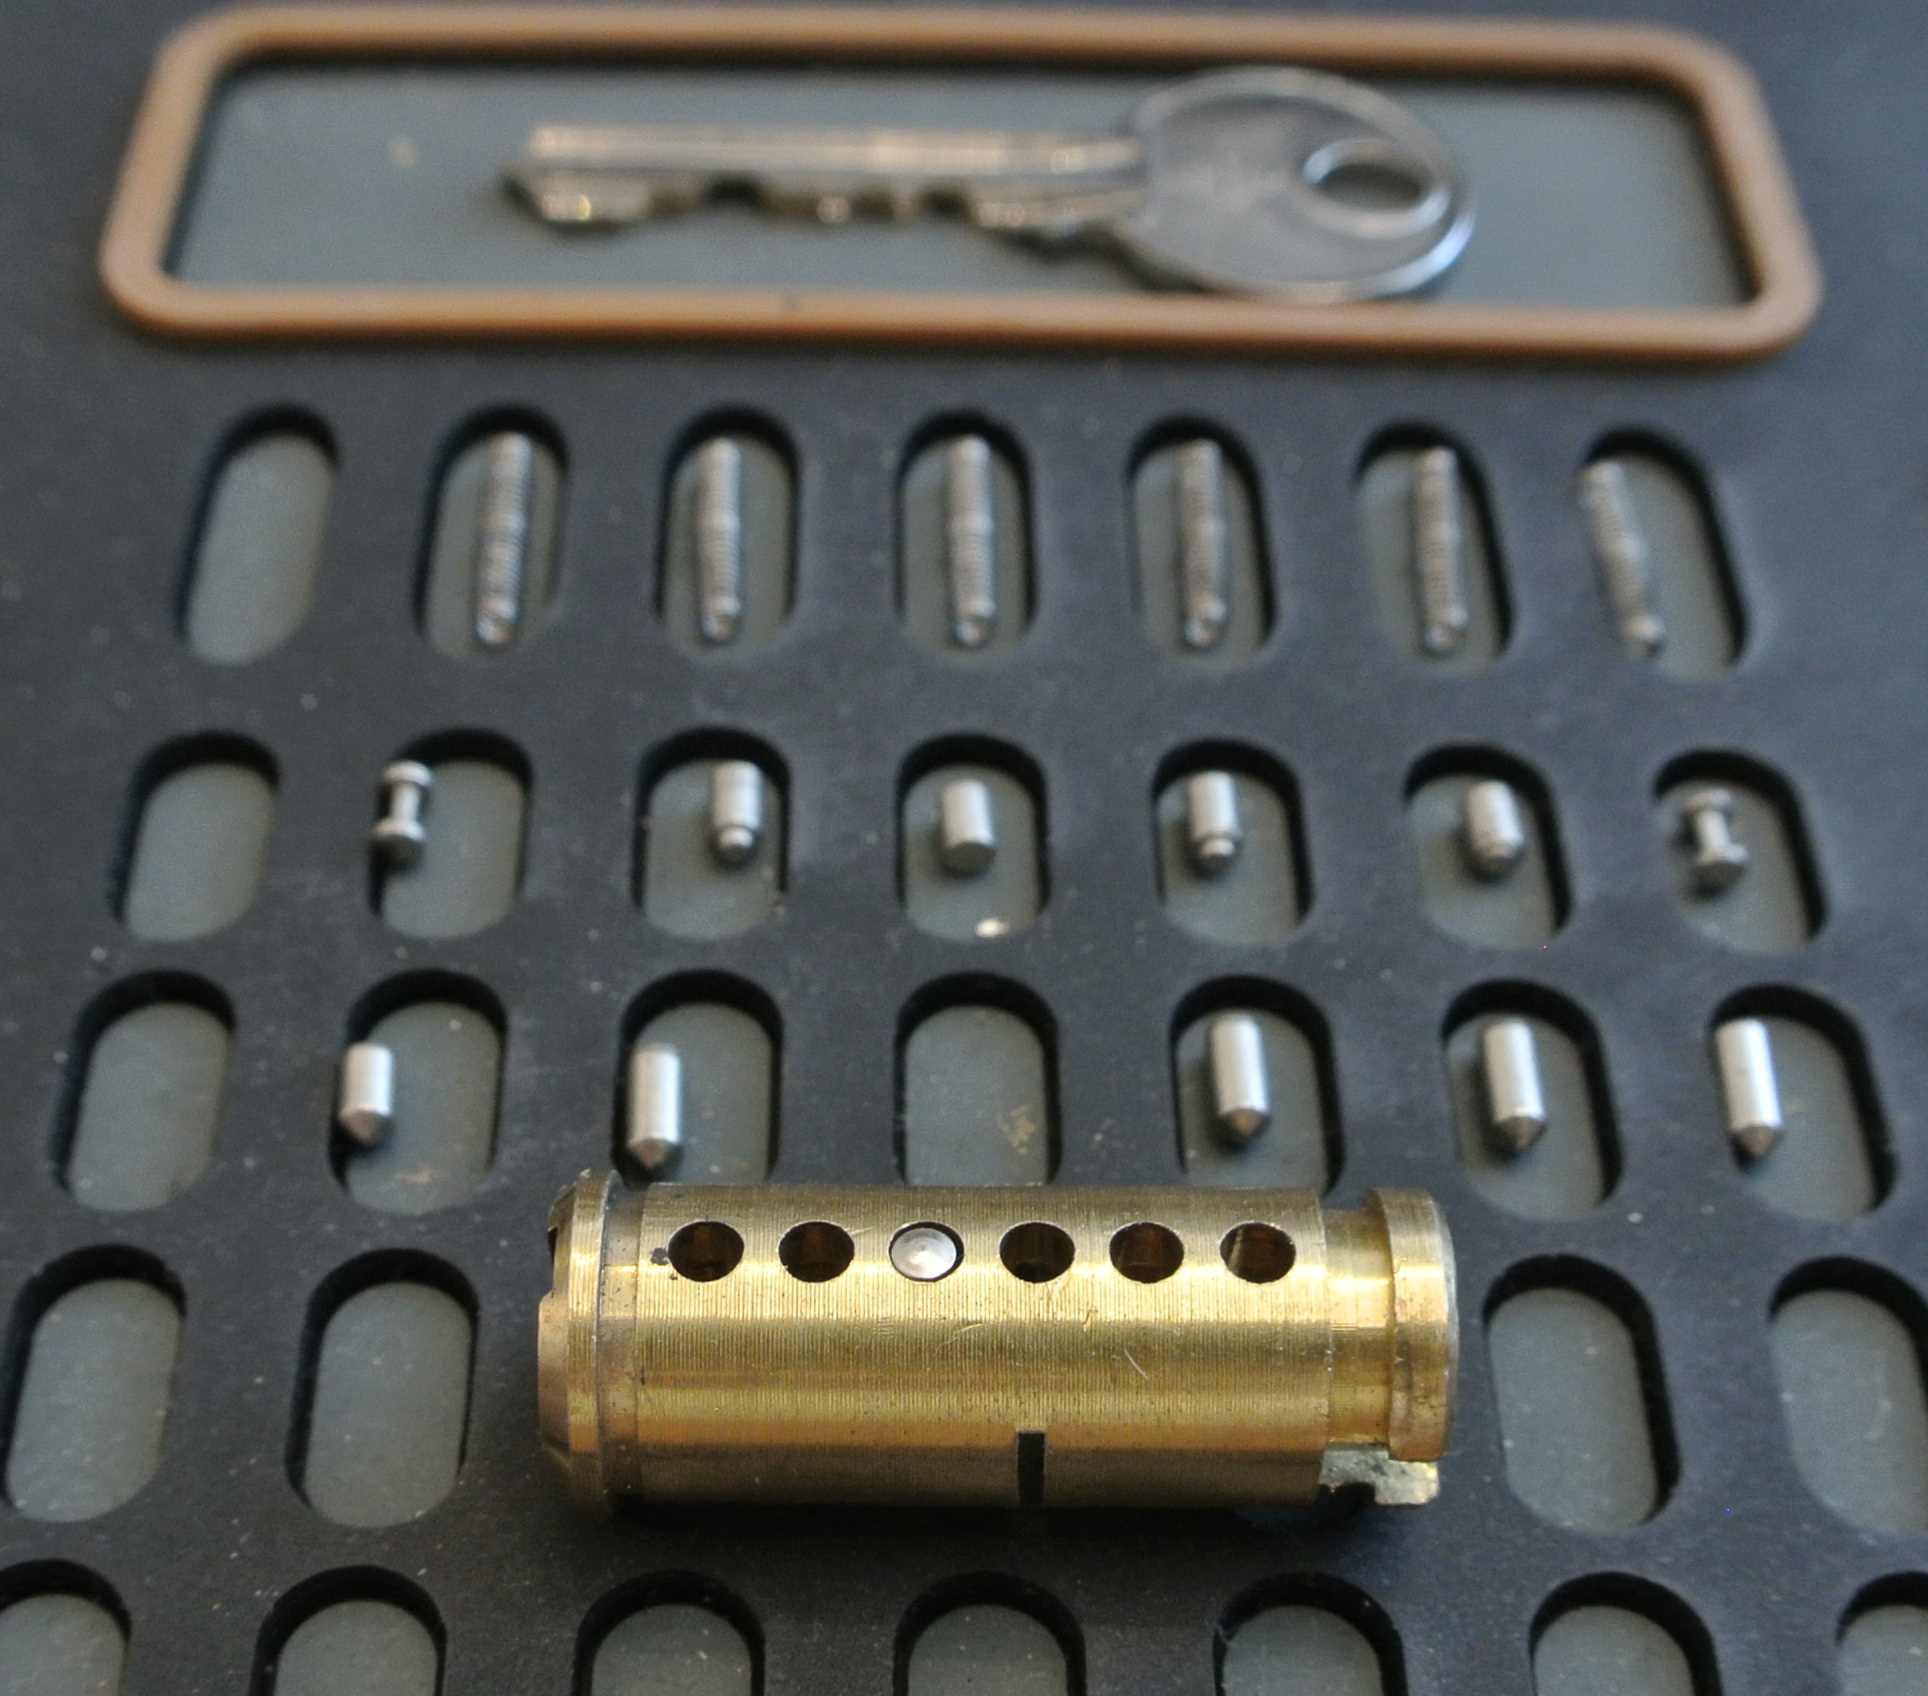
While I typically don’t deal with destructive methods, I still wanted to take a quick look at the cylinder design to prevent these attacks.
As we can see, on the following pictures, there are multiple anti-drill and anti-snap features in the core and housing:
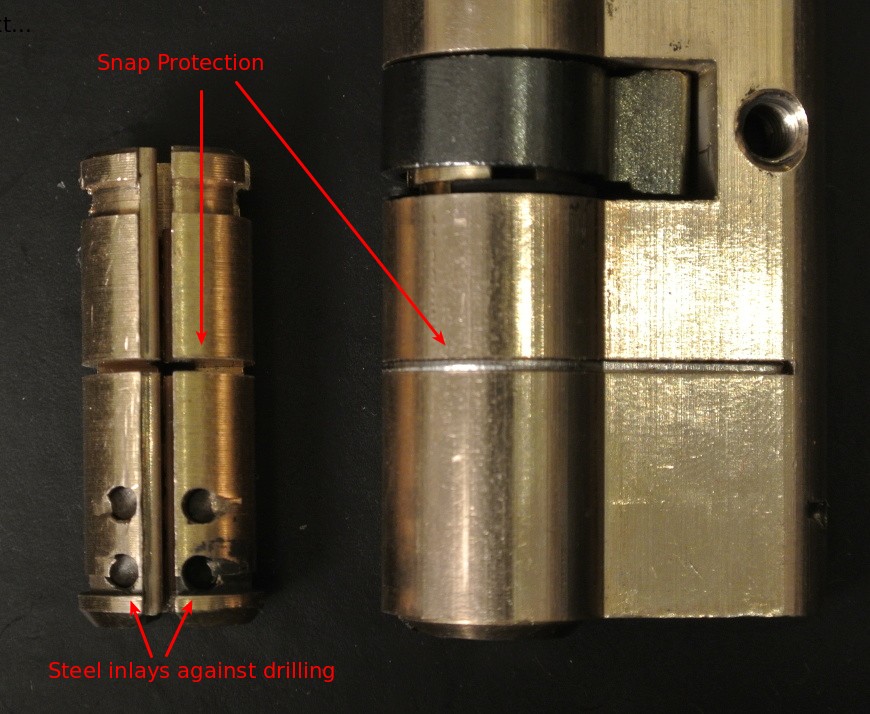
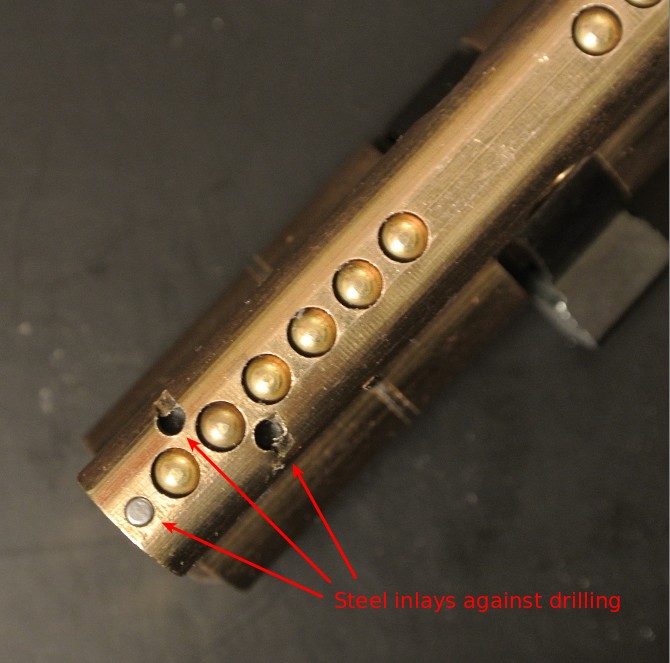
The anti-snap feature is a predetermined breaking point. If you try to break the cylinder using the common methods, it will break around the fourth pin hole and not in the middle as required for a successful opening.
Overall, these features look solid to me and the cylinder has a 1-star KiteMark on it, which means that the resistance against destructive entry has been validated independently.
Negative remark: E-Pick
Unfortunately, while hand picking is sufficiently non-trivial on this cylinder, using an E-Pick isn’t: It took me less than a minute to open the cylinder using an MHP II. In my opinion it’s much more likely that a burglar uses an E-Pick compared to hand picking because using an E-Pick is much easier to learn and often faster than hand picking as well.
While it’s hard to make cylinders more resistant to the E-Pick without making them expensive, I think that UAP should consider securing their product somehow against that kind of attack as well.
So, dear UAP: You could make this product the perfect low-budget solution if you manage to fix this :)
Summary
Summarizing, the UAP+ ZeroLift is a 6-pin, 1-star KiteMark cylinder resistant to
- Drilling
- Snapping
- (Hand-)Picking
- Bumping
for the price of only 12.49 GBP (around 17 EUR / 19 USD). For the same amount of money, you can hardly get anything else on the market that has the same defensive capabilities. If you have little money to invest, you are trying to protect only against regular burglary attempts and you don’t need advanced things like copy-protected keys, master key systems and such, then buying this cylinder doesn’t seem like a bad idea to me. Of course, a cylinder at this price has limits and the general disclaimers apply: The value of the assets you are trying to protect and the risk of theft should match your cylinder and door/door furniture choice.
But in general, I like the idea of having a low-priced cylinder for the masses that still provides a certain level of protection for the most common attacks and I think UAP has already done a reasonably good job here.
- 10 Jul 2014 » Preview: PhotoBump - Working plastic bump keys for any profile
Historically, bump keys have only been a problem if blanks were available for the targeted lock. They provide a convenient and fairly easy way (at least compared to lock picking) to open a lock in little time, if it is vulnerable to bumping. While there are locks on the market, that are immune to bumping, a large quantity of locks in use is theoretically vulnerable, but practically protected by their profile. Blanks fitting the profiles of these locks are restricted, so obtaining them is harder than usual. In some cases, they are also protected by law, such that bump keys couldn’t be made commercially available, even if there was a source of blanks. This has changed now…
Note: The following article is a preview on the upcoming presentation at LockCon 2014. Technical details and software are left out on purpose and will be described/published more detailed later.
PhotoBump
At LockCon 2014, I will present a technical process that allows you to create a working bump key only using a photo of the keyway and the manufacturer specific details about the lock series. The latter is easy to obtain, as the major key blank manufacturers provide software including large databases that list all the specific characteristics per manufacturer and system. In detail we need
- Photo of the keyway
- Position of the pins on the key blank (distances)
- Maximum cut depth (to duplicate keys, information about the different heights)
- Cut angle, plateau length
As mentioned before, none of these characteristics are secret and they are typically shared at least across the lock series. Some manufacturers also use the same characteristics for multiple series even.
From that information, we can create a 3D model of the requested bump key which we can then manufacture (through 3D printing).
Demo
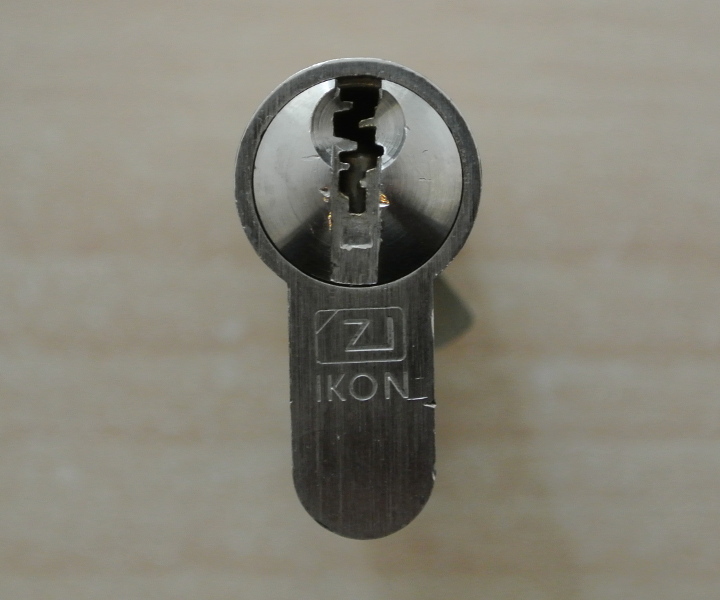
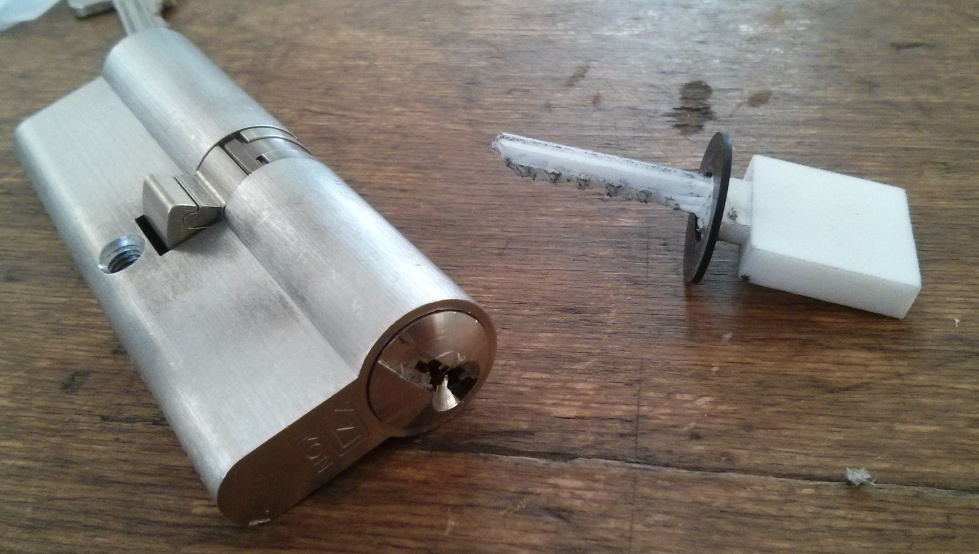
So far, I have successfully created a key blank for a protected profile and then used a regular key cutting machine to create a bump key out of it (the bump key could have been printed directly as required, but at that time, the software did not have the functionality yet to perform this, which is complex). The cylinder attacked here is a Zeiss IKON SK6 with a restricted profile. Note that this particular cylinder is probably not an easy bumping target anyway (it has 6 pins and a deep spool). I tried a metal bump key on that one (created from one of the existing keys) and did not succeed in bumping it with that. With the plastic bump key, I was successful multiple times. Here are a few pictures and a video for preview:
The target cylinder (IKON SK6, protected profile):
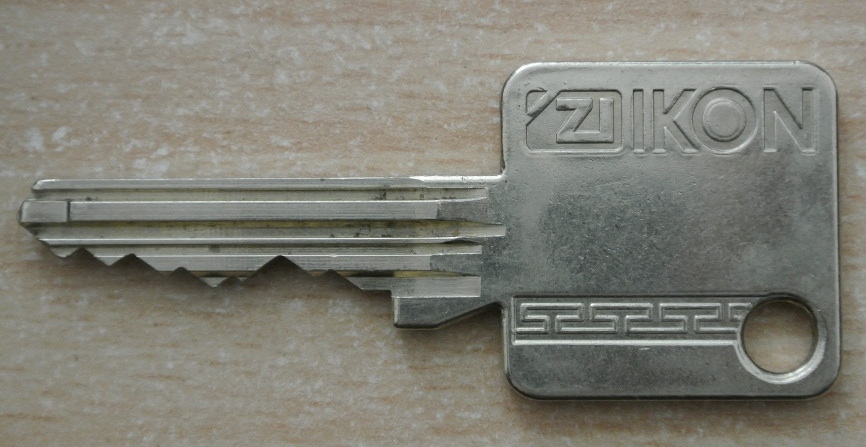
The corresponding key, pin 3 is a spool and causes the cylinder to false set when not enough force is used during bumping:
Here we have the 3D model of the blank. The software can also directly create the bump key as a 3D model, as well as a copy of the original key, given the key combination:
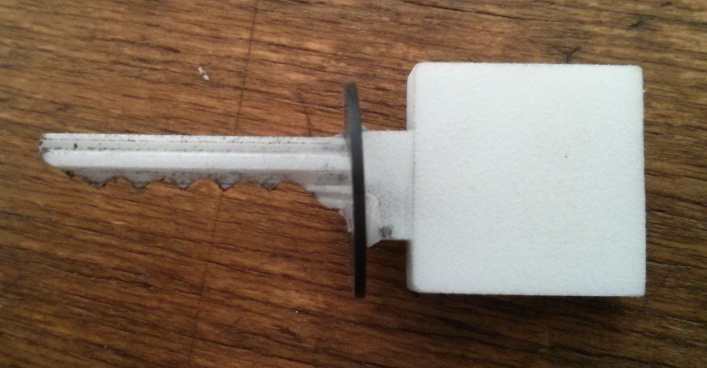
The bump key, cut from the modeled blank, and the bumped cylinder:
Finally, here’s a video demoing the bumping process. As you can see, it takes a bit to bump the cylinder, but that’s not due to the key being plastic, but rather because the cylinder isn’t easily bumpable.
The software I wrote for this purpose works almost automatically, and given the manufacturer-specific measurements, it can not only create bump keys but also working key duplicates.
Coming Up Next…
At LockCon 2014, I will present the details including the software described here. If all goes well, I will also be able to show printed bump keys for the ABUS E20/E30 cylinder that everyone can try out. There’s of course no guarantee that I’ll get these working in time, but let’s hope for the best :) See you at LockCon!
- 08 May 2014 » Beware of the KESO
The KESO series of dimple locks is a well known and (in Europe) very commonly used high security cylinder series that provides not only a high amount of pick resistance but is also outstanding in terms of resistance if offers against destruction (optional pulling protection, full steel housing, etc.). It is well known that these locks can be picked though, although it requires a fair amount of skill and is also somewhat depending on the state and pinning of the lock.
It is also not new that turning these locks by 90 degrees when picked can destroy them, because most of these cylinders have their keyway open at the bottom, such that one row of the side pins will fall into the keyway (key pins, drivers and springs), if not held back by a key. Some other models have a thin piece of metal at the bottom, covering the keyway opening. While this would pose a problem when trying to turn such a lock by 360 degrees to unlock a door, it is not unsolvable. A custom made tension wrench or a key, cut in half, can help overcoming this difficulty.
However, recently I’ve found a far more troubling problem with picking some KESOs.
Once upon a KESO
I decided to pick a KESO cylinder I had in my collection, that had its keyway closed at the bottom. So in theory, even if I turn 360 degrees, nothing bad should happen. It took a while but I successfully picked it, and turned it 90 degrees. Before reaching the 90 degrees, I already noticed that the core was starting to provide more resistance when turning. On positions 90, 180 and 270 degrees I had to repick only 1-2 pins each time (in fact, many KESOs I tried don’t have overlapping dimples at all and can be turned 360 degrees without relocking). However, the core was getting harder and harder to turn, until I finally got the 360 degrees and closed it. But the core was still very hard to move, and I was puzzled about what could have happened.
Dissecting the cylinder
Since I had no key and picking it again was not an option given the amount of force required to turn the plug, I decided to dissect the cylinder forcefully with the help of a friend. We made three cuts into the housing so we could just remove it carefully, which revealed what happened: On position 2 of the top row pins, the combination of key and driver pin is so short that it fits entirely into the core, leaving space for the spring to also reach into the core. Furthermore, the driver pin is so thin, that picking it while the core has already turned a bit can cause it to “flip” in the housing standing vertically. My guess is that I either picked all the pins and left that one untouched, or I managed to flip that driver pin with the picking. Either way, it lead to the spring being pulled between core and housing, slowly making its way through the metal, causing the core to block.
Here are two pictures of the core when I took it out of the housing:
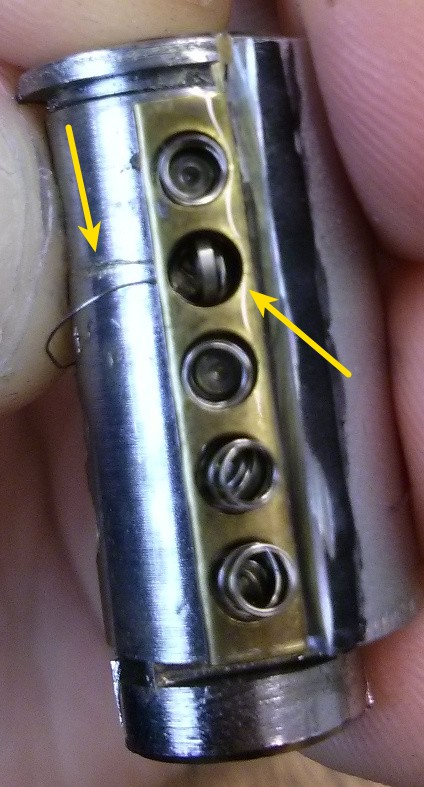
As you can see, the pin on position 2 has turned (and this did not happen while we opened it) and the spring is already jammed up between the core and the bar part containing the driver pins.
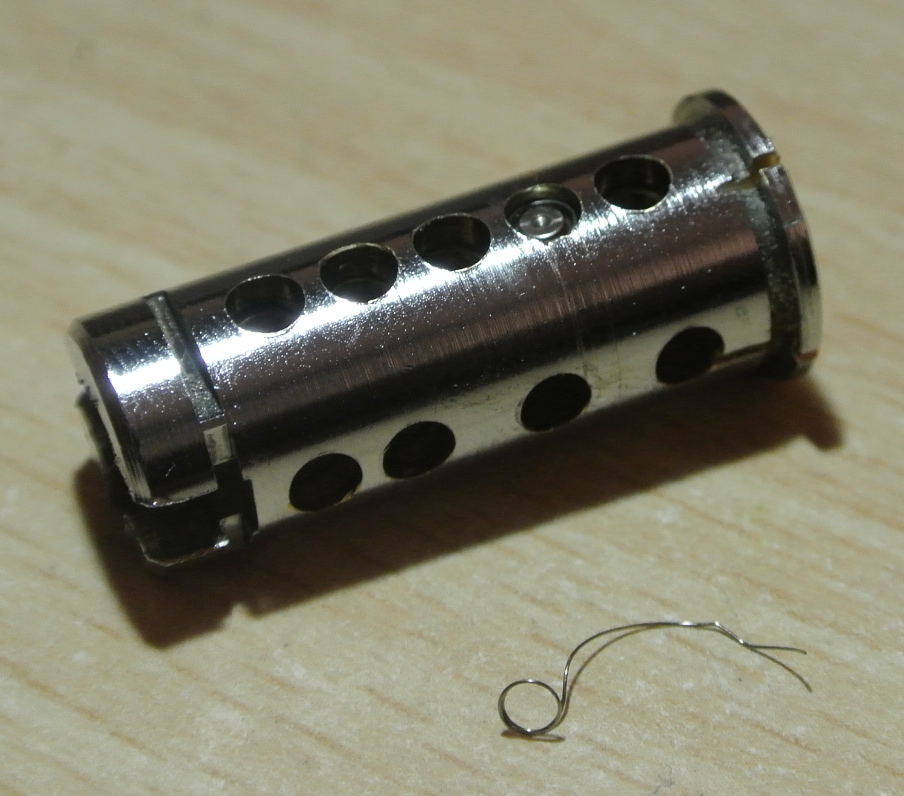
Here’s a picture of the key pin together with the driver pin entirely fitting in hole 2 of the core, leaving space for the spring. The broken spring is in front of the core.
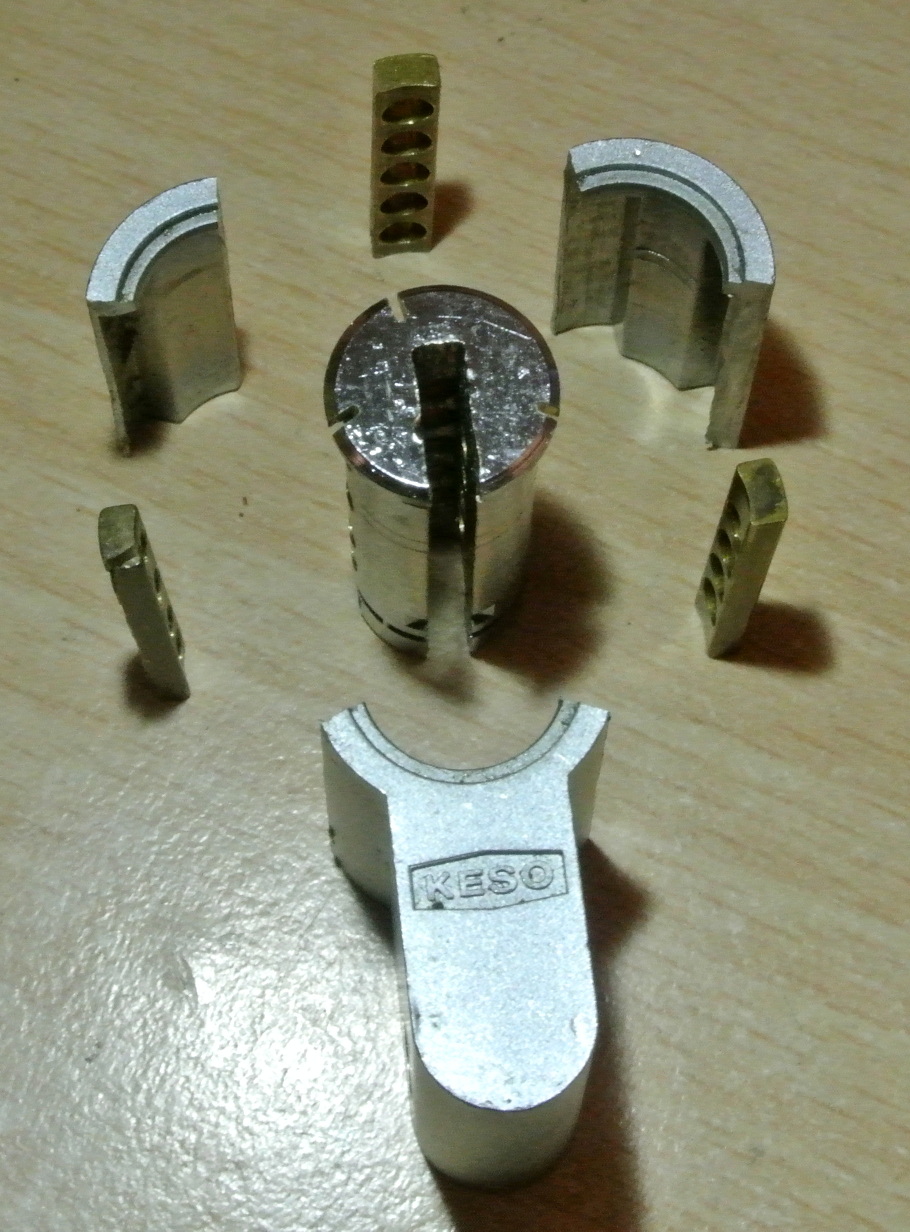
Finally, this is how we dissected the cylinder (all pins already removed for this picture):
Conclusion
Picking KESO cylinders is possible, but not in a (guaranteed) non-destructive way. While some KESOs behave fine when picked, others might just break as described. Be absolutely careful with picking these, even turning them less than 90 degrees could break them already. I don’t know if this is an intended feature of some KESOs or just bad luck, but for now we can just speculate.
- 19 Jan 2014 » A look at the ABUS EC700/800
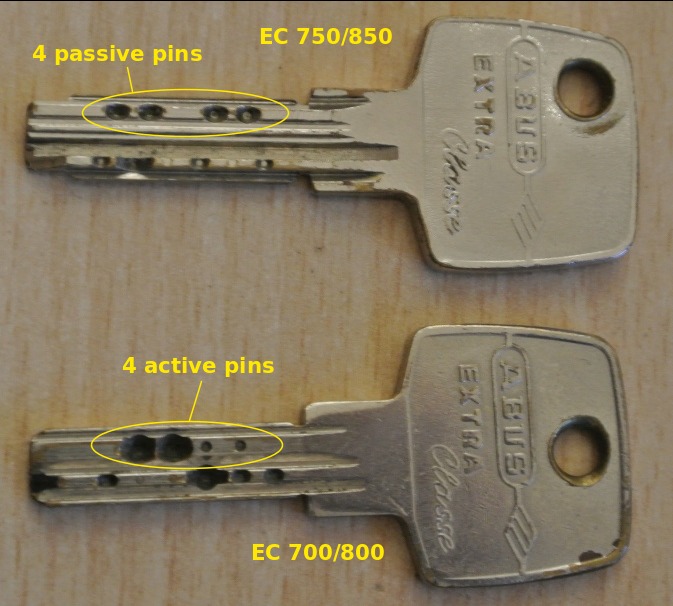
The ABUS EC 700/800 is an older dimple lock series that has been superseded for a while by the EC 750/850. Both series look somewhat similar, especially their keys. However, there is a huge difference between them: While the EC 750/850 has 6 active pins in its main row plus some passive pins from the top, the EC 700/800 has 4 active pins coming from the top in addition to its 6 main row pins. The total of 10 active pins itself wouldn’t be a big issue yet, if the top pins wouldn’t be exactly facing the bottom pins. With this design, the top pins are overlifted by the bottom pins in their default state. This makes the EC 700/800 one of the most difficult to pick pin tumbler locks.
Note: I think this lock was manufactured by CISA like its successor, but if someone could confirm that (and tell me how it was called), that would surely be helpful.
Note: The orientation is quite important when talking about this cylinder. I will call the 6 pins in main row “bottom pins” from time to time, while calling the second active row of 4 pins “top pins”. This matches the lock’s use as a euro profile cylinder in Europe. Sorry my American friends, you will have to think the other way around now ;)
Telling the difference
The differences between the EC 700/800 and the 750/850 are already visible when looking at the cores:
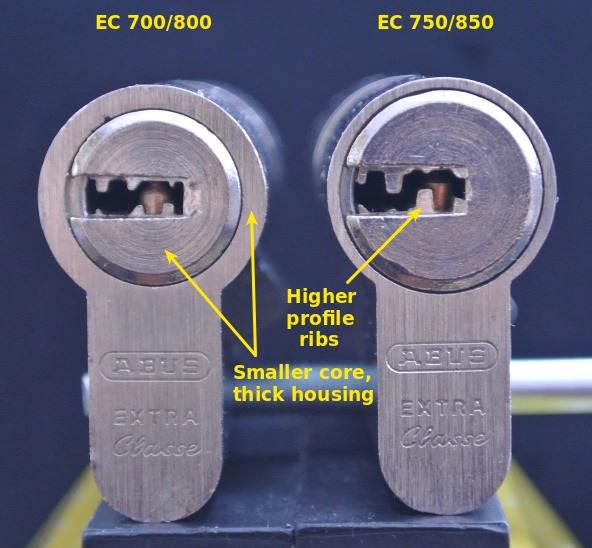
One can clearly see that the core of the EC 700/800 is smaller while the housing around it is much thicker. This design allows enough space for the driver pins and springs of the 4 active top pins.
Key and Pins
A look at the key already reveals some information about the position of the pins:
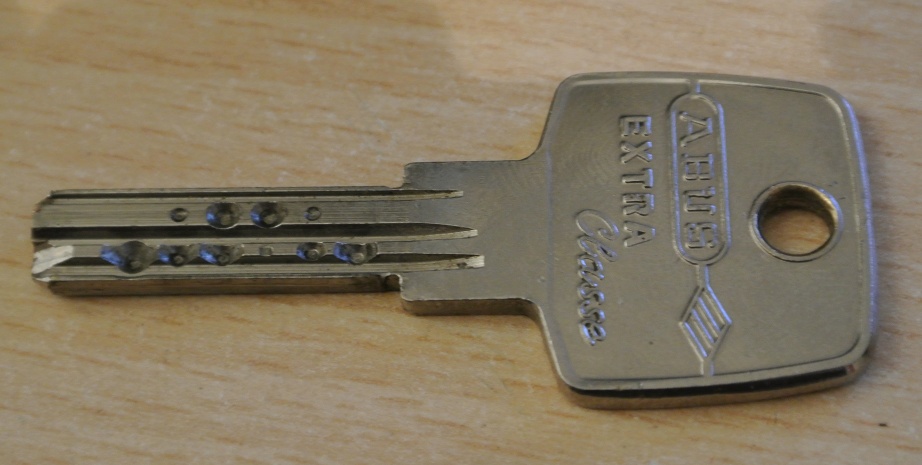
We can see that the bottom row consists of 6 pins, where pins 2-5 face the 4 pins in the top row. Note that the EC750/850 key also can have 4 holes in almost the same position, however, these holes are all the same depth and meant for the passive pins. So in order to distinguish the EC700/800 from the EC750/850 only by the key, just take a look at the 4 holes of the top row. If they have different depths, then it’s an EC700/800:
Here’s a picture of the pins used, posted by ingoingo on the Koksa Board:
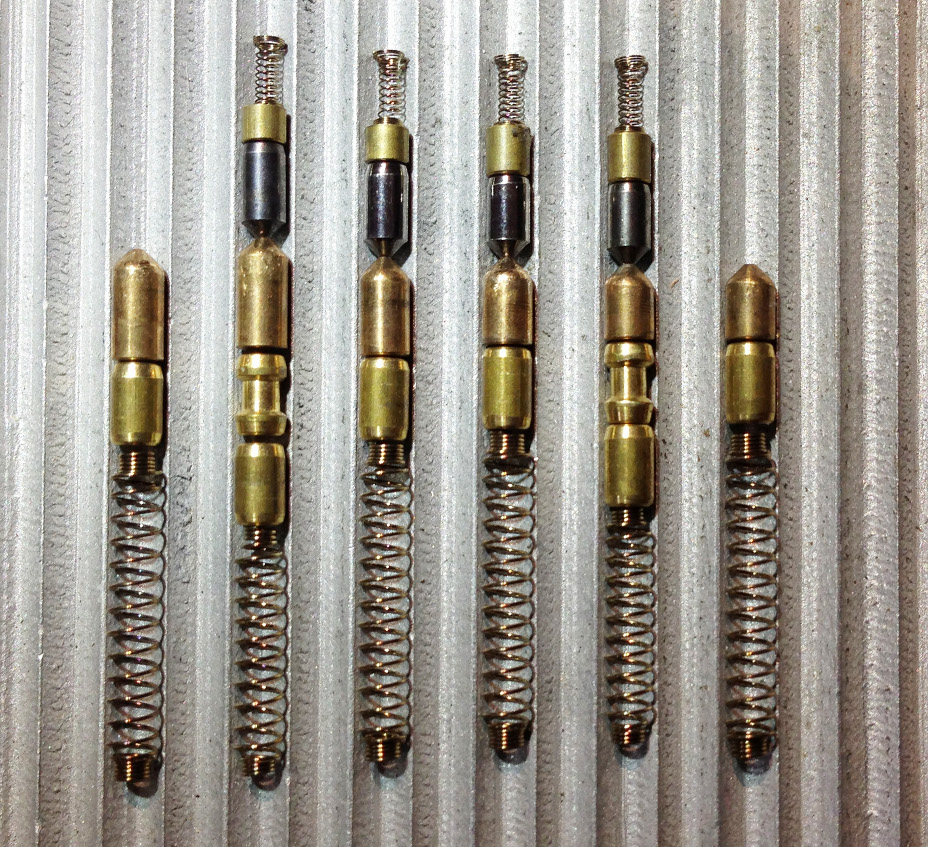
The position of the spools may vary, but having them at position 2 and 5 seemed like a very common thing for most of my cylinders. We can also see that all the driver pins have rounded ends, which makes them much harder to pick. Combined with the high accuracy of this cylinder, the rounded ends cause less feedback when setting a pin and require much more tension to stay in place.
The difficulty for non-destructive opening
As we’ve seen now, the top pins face the pins 2-5 of the main row while pins 1 and 6 of the main row do not have a corresponding upper pin. This is why by default, the top pins are not visible at all because they are entirely overlifted by the bottom pins which have stronger springs. If one starts to pick the main row now, then at some point, one of the top pins is likely to bind, but it will likely be still overlifted. Combined with a highly accurate manufacturing process, this makes it quite impossible to pick the lock the regular way. I’ve heard that some people raked some of these locks, but until now, there was no known reliable method for non-destructive opening that I know about.
After some experiments, I quickly found out though, that either clockwise or counter-clockwise, the top row binds and can be set entirely separate from the bottom row. Initially I used a piece of metal to hold down the main row pins and simultaneously tried to pick the top pins. After the top pins had been set, there was a fair (visible) amount of rotation and the main row was binding. This amount of rotation allowed to ease up the tension a bit and allow the main row pins to come back (since they will be overlifted now as well). Finally, this allowed the main row to be picked and the lock opened after a huge amount of time. The whole method was still very impractical though because the tool wasn’t very convenient and it also wasn’t clear if this would work with other models. Here’s a picture of the initial (successful) attempts:

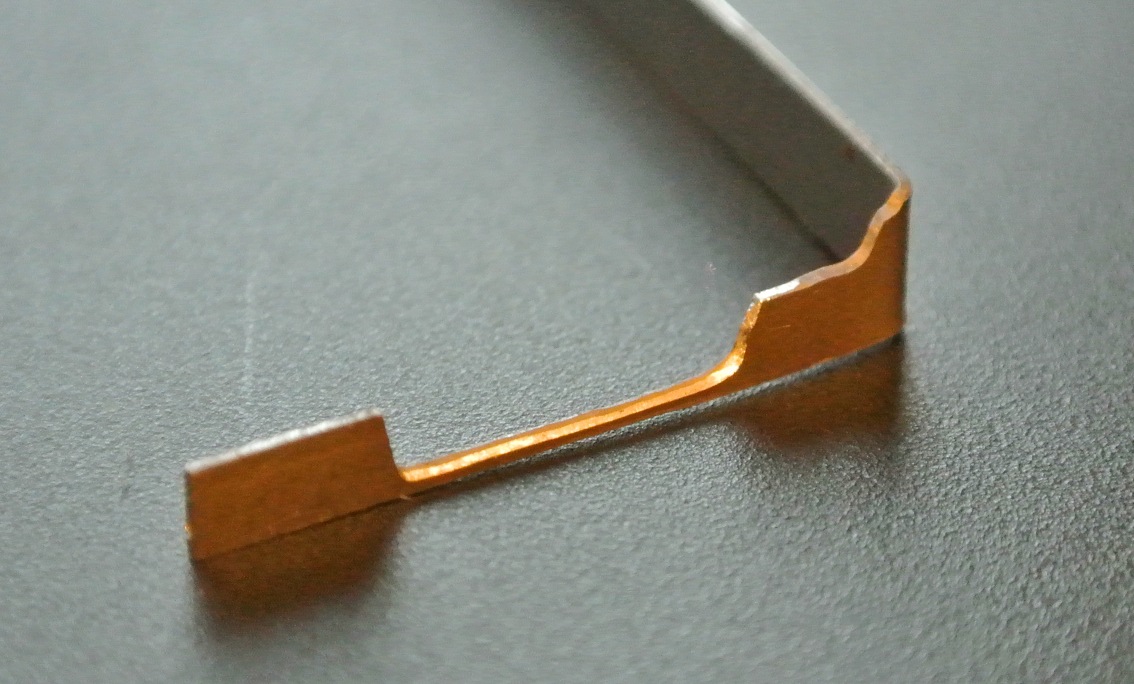
Creating a little helper tool
It took a while until I finally came up with a simple idea on how to hold down the bottom pins easily while picking the top pins. The idea was to use a long tension wrench diagonally inside the lock, holding down the main row and touching the upper right corner of the lock with the other side. However, in order to allow the top pins to freely move, the tension wrench would need a large hole in the middle, matching the position of the top row. My initial prototype looks like this:
Using this tool, I was able to open all of my 5 ABUS EC700/800 models either clockwise or counter-clockwise. When opening counter-clockwise, the tool acts both as a tension wrench and to hold down the bottom pins. When opening clockwise, a second tension wrench is required to apply tension and the tool solely holds down the pins:
Result and Conclusion
This is the result of a few hours of picking time:

While this lock can also be opened non-destructively as shown, I think that the design is something that deserves appreciation and more popularity. Having several locking elements overlifted by default (when no key is inserted), is an effective way to increase manipulation difficulty. Not only does this make manual picking very hard, but it also effectively prevents bumping and other semi-automatic methods. I could imagine that one of the problems was that the top springs would fail earlier since they’re under tension all the time, but this could probably be resolved by investing more into robust springs for the top row.
- 14 Jul 2013 » Picking Slider Based High Security Locks - Part 3, EVVA Dual
In the last part of this article, we discussed the EVVA 3KS as a springless slider-based lock. In contrast, one of the older cylinders manufactured by EVVA, the EVVA Dual, is a slider-based lock that uses the same amount of sliders and sidebars, but the sliders are backed by springs. We’re now going to discuss how that affects picking this cylinder.
- 19 Mar 2013 » Picking Slider Based High Security Locks - Part 2, EVVA 3KS
In the first part of this article, we discussed the ASSA Desmo which has a limited amount of sliders and a relatively large keyway. With the same methods, we’re going to try to open an EVVA 3KS now.
- 14 Mar 2013 » Picking Slider Based High Security Locks - Part 1, ASSA Desmo
In this and the next article, I’ll describe how to pick two springless slider-based locks. In general, these locks work the same way: They have springless sliders on each side of the lock that have one or more cuts (also called gates) for a sidebar to enter them. In order for the sidebar to fit in, the sliders must be moved to a certain height each. Usually, the sliders each have a pin/knob on them that the key can interact with. For this purpose, the key has one or more tracks on its sides. When the key is inserted, the pins of the sliders on each side fit into the track and get moved to the correct height. Don’t worry, this probably gets much clearer with some pictures. For our first lock we’ll use the ASSA Desmo.
- 09 Mar 2013 » First!
What is this all about?
After some people asked me to blog about my hobby, I finally decided to create this page. So what is it about? It's about a sport called lock picking which is concerned with non-destructive opening of locks.